Francisco Camargo

Data Scientist & Machine Learning Engineer
View the Project on GitHub francisco-camargo/francisco-camargo
Python
Install Python on Windows
Link to download Python.
During installation, be sure to add Python to PATH:

Check the version of Python. Note that it can have different aliases, e.g. python, py, python3 etc.
python --version
>>> Python3.11.0
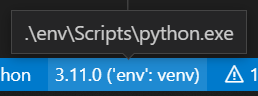
If you use VSCode, be sure that the desired Python Interpreter is used: from the Command Pallette search for Python: Select Interpreter. Can check the bottom right of the window:
Install Python on WSL
give an alias
alias python = python3.10
Guide to install pip
sudo apt-get update
sudo apt-get upgrade # not needed according to guide, but may as well
sudo apt install python3-pip
Project structure
- Things to consider adding/using when making a new Python project
- Cookiecutter and Makefile
README.mdLICENSE.gitignore.gitattributes: use to control end-of-line characters when committing to remote.gitconfig: configure local credentials (and many other things). Do not commit to the repo!.env: file with environment variables that be be used by easily used containers and code (viapython-dotenv). Be very careful to not commit sensitive information to the repo!.pre-commit-config.yamllink.markdownlint.yamlfor Markdown file lintinguvorvenv: set up virtual environmentspyproject.toml: A configuration file introduced by PEP 518 used by Python packaging toolsrequirements.txt: alternative topyproject.tomlto handle package dependencies- logging config file
srcandtestsdirectories- CI config files, e.g.
.github/workflows/ci.yaml
Python Code Environment
Download and install Python from link
venv on Windows
To create an environment via the terminal, use
python -m venv env
To activate environment, use
env/Scripts/activate
In git bash may have to use . env/Scripts/activate
To update pip, use
python -m pip install --upgrade pip
To install libraries, use
pip install -r requirements.txt
To deactivate an active environment, use
deactivate
venv on Ubuntu
On Ubuntu, you may need to install python3-venv, link
sudo apt install python3-venv
Create the virtual environment
python3 -m venv env
Activate the environment
. env/bin/activate
Upgrade pip
python -m pip install --upgrade pip
Install python libraries
pip install -r requirements.txt
Deactivate the environment
deactivate
uv on Windows
Installation
As administrator, run the following on Windows PowerShell
powershell -ExecutionPolicy ByPass -c "irm https://astral.sh/uv/install.ps1 | iex"
To verify installation, open a new terminal and run
uv version
This ran in PowerShell and git bash
New Project
To start a new project, run
uv init <project name>
if a git repo already exists, within the repo you can just run
uv init
(or maybe)
uv init .
?
This creates several files, including pyproject.toml
Virtual Environment and Package Management
To create a virtual environment (equivalent to python -m venv .venv), run
uv venv
However, with one command we can create both a virtual environment and install packages, for example by running
uv add pandas
results in
Creating virtual environment at: .venv
Resolved 7 packages in 487ms
Prepared 6 packages in 21.42s
Installed 6 packages in 2.29s
 + numpy==2.2.6
 + pandas==2.2.3
 + python-dateutil==2.9.0.post0
 + pytz==2025.2
 + six==1.17.0
 + tzdata==2025.2
and it also updates pyproject.toml to include pandas as a dependency.
To remove a dependency,
uv remove scikit-learn
Run code
uv created a .venv folder which VSCode noticed and is not using as the virtual environment path.
To run code from the terminal,
uv run <python file>
Testing
Importing local code from other directories
Assume you have the following folder structure:
parent
  scriptE.py
  folder1
    scriptA.py
    scriptB.py
    folder3
      scriptF.py
  folder2
    scriptC.py
    scriptD.py
and the current working directory is folder1.
If you need to run from a submodule directly such that __name__ is '__main__', try adding the parent directory to the system path
try:
    from folder1.folder3 import scriptF
except ModuleNotFoundError as e:
    sys.path.append(os.getcwd())
    from folder1.folder3 import scriptF
If you want to do relative imports: good write-up. My current understanding is that whatever script is '__main__' will not be able to utilize relative imports!
Again assume the current working directory is folder1:
- For
scriptB.py, useimport scriptB - For
scriptF.py, useimport folder3.scriptF - For
scriptE.py, you must use thefromsyntax;from ..scriptE import * - For
scriptC.py, usefrom ..folder2.scriptC
Here are some useful commands to help debug some of these issues:
    import sys
    print(f'system path: {sys.path}')
    import os
    print(f'current working dir (cwd): {os.getcwd()}')
    print(f'ls within cwd: {os.listdir('./')}')
    print(f'ls within ../cwd: {os.listdir('../')}')
Running Python code in VSCode
To use the IPython terminal, install IPython
pip install ipython
Then in the VSCode terminal run
ipython
need to load (once) the %autoreload extension, guide,
%load_ext autoreload
now can use %autoreload
%autoreload
%run main.py
I was able to run both of these lines together in the VSCode terminal by using Ctrl+o in the terminal to have multiple lines of input.
This will have the same effect as clicking Run within Spyder on whatever Python file Spyder has open. This also has the benefit of seeing changes to the code while still in IPython, which is not working when using the “import main” approach.
(old) and then within the IPython terminal that has now been instantiated, import the module you want to use
import main; main.main()
pyproject.toml
The documentation for black suggests that we can use a pyproject.toml file to replace both setup.py and setup.cfg files.

Packaging
Learn how to package code, there are several options, so first want to just look at all of them before picking one to run with
Guide, in it, they say: nowadays the use of setup.py is discouraged in favour of pyproject.toml together with setup.cfg. Find out how to use those here.
Poetry also does a similar thin? There may be some serious problems with Poetry. webpage Sounds like poetry also does dependance management, so maybe use it instead of venv? Poetry intro from ArjanCodes, who seems happy with it. Sounds like it can help with package publishing.
What the heck is a wheel?
Plotting
I can plot out-of-the box to a pop-up window in VSCode if I use Run, but if I use ipython to run the code, I can’t seem to be able to get the plots.
In ./src/plotting.py I placed sample code for a plotting function that handles the aesthetics well. It Accounts for; uncertainty bands, .eps formatting, size of plot for two column paper, and several other minor details.
Data Validation
Pandas
Data Types for DataFrames
df.apply()
SettingWithCopyWarning
Guide, simple explanation on how to deal with this. First line of defense: use .loc and .iloc
df.loc[idx_label, col_label] = some_new_value
I think idx_label then just needs to be an element found within df.index().
Alternatively, you could use a mask. By example:
mask = df[column_label]==some_value
This returns a mask of boolean values to pick out rows. Now use this mask instead of idx_label
df.loc[mask, col_label] = some_new_value
SciKit-Learn
Want to be able to use sklearn without having to switch back and forth between numpy arrays and dataframes. Use sklearn-pandas. I have successfully used this in make_features.py within the dsc_roadmap project; import DataFrameMapper and use it in conjunction with the sklearn SimpleImputer.
ShuffleSplit
StackOverflow on why ShuffleSplit is useful as training data size grows
FutureWarning: This Pipeline instance is not fitted yet
I created a custom class to use as part of a feature engineering Pipeline and was getting this warning. One way to get this warning to go away is to add an Estimator at the end of the Pipeline but that is undesirable as I want this pipeline to be dedicated to feature engineering.
This post has as solution that I think is better. Essentially, in variables defined within the custom class, name them with an underscore suffix.
class CustomClass(BaseEstimator, TransformerMixin):
    def __init__(self, attribute):
        self.attribute_ = attribute

    def fit(self, X, y=None):
        scale_cols_ = X[self.attribute_]
        return self
It seems like this works even if I only apply an underscore suffix to one (and not all) the attributes. Also not sure if it matter if it’s a method instead. I don’t understand why this works in the first place, but I can live with it and it enables the use of custom transformers to be used in Pipelines!
Experimental Setup
Guide into how to use Hydra to help run experiments using Python.
Video intro
Video mentions integration with mlflow around 20min mark, talks about parallelization (26min mark)
Video for hydra-zen
Model based testing
There is the hypothesis python package. Docs, demonstration
Logging
Don’t pass logger around as a function input, instead import logger into each script of interest
Very simple logging:
import logging

logger = logging.getLogger(__name__)
logging.basicConfig(
    level=logging.INFO,
    format='%(asctime)s - %(levelname)s - %(message)s',
)

logger.info('Added an entry to the logger')
More sophisticated logging:
"""
Logging Configuration Module

This module sets up a centralized logging configuration for use across the application.
It configures a logger that writes to both a file (overwriting it on each run) and the console.
The timestamp in log messages is set to GMT (UTC) time.
Log messages include the filename and line number instead of the logger name.

The module provides a pre-configured logger object that can be imported and used in other modules.

To use this in another script
  from src.logging.log_config import logger
  logger.info('Write this to the log')

Attributes:
    logger (logging.Logger): A configured logger object for use across the application.
"""

import logging
import sys
from time import gmtime

# Configure the logger
logging.Formatter.converter = gmtime  # Set time to GMT

# Create a logger
logger = logging.getLogger(__name__)
logger.setLevel(logging.INFO)

# Create file handler which logs even debug messages
file_handler = logging.FileHandler('src/logging/app.log', mode='w')
file_handler.setLevel(logging.INFO)

# Create console handler with a higher log level
console_handler = logging.StreamHandler(sys.stdout)
console_handler.setLevel(logging.INFO)

# Create formatter and add it to the handlers
formatter = logging.Formatter('%(asctime)s - %(levelname)s - %(filename)s:%(lineno)d\n\t%(message)s')
file_handler.setFormatter(formatter)
console_handler.setFormatter(formatter)

# Add the handlers to the logger
logger.addHandler(file_handler)
logger.addHandler(console_handler)